The $20 or Less Etsy Gift Guide

Instead of tossing elbows with the masses on Black Friday, why not opt for something simpler? Etsy is a fabulous place to get unique, cutomized and affordable gifts, but I’m sure you already know that. With millions of options, though, it can be just as overwhelming and treacherous as a doorbuster deal gone bad. Solution? Check out my Etsy Christmas survival guide below, featuring nine gifts as original as your friends – for just $20 or less.

For the artistic one:

Fox Watercolor Print - $20

Fox Watercolor Print – $20

What does the fox say? Buy me. Amber Alexander has over 374 quirky but outstanding watercolor paintings and prints. Going postal? Be sure to check out her Christmas cards, too.

For the Disney-lover:

Framed Peter Pan Glitter Silhouette

Framed Peter Pan Glitter Silhouette – $10

Never grow up? Sounds like a plan to me. Poppies and posies features mostly framed and matted Disney-themed silhouettes. Each picture is 100% customizable, so the possibilities are as endless as Tink’s supply of pixie dust.

For the wandering soul:

Travel Journal Notebook - $16

Travel Journal Notebook – $16

Lost with wanderlust? Set them free with one of several travel-themed journals from Istria Design. Be sure to write your address on the inside cover so they can thank you with postcards from their globetrotting journey.

For the phone junkie:

Color Palette iPhone 4 Case

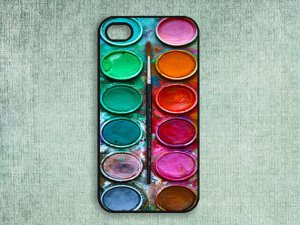
Color Palette iPhone 4 Case – $10.99

From Disney to Dr. Who, Captain America to Hepburn, iPhone Case 001 has a little bit of everything. Personal yet functional. With 309 cases to choose from, there really is something for everyone.

For the Harry Potter freak:

Rose

Harry Potter Book Rose – $2.50

Book-lovers are bound to go crazy for these precious HP roses by Wednesday Thursby. Get it? Bound? Oh, okay. You got it the first time.

For the dude:

Bacon Soap

Bacon Soap – $6

Fact: Guys use soap. Fact: Guys love bacon. Conclusion: Get him bacon soap. If he isn’t a stereotypical bacon fanatic, then check out some of the other 539 food-themed choices from AJ Sweet Soap and pick his favorite dish for the soap dish.

For the writer:

Pheasant Feather Quill Pen - $8.33

Pheasant Feather Quill Pen – $8.33

The sacred feather of this quill from Whillock hails from the mighty eagle of Middle Earth’s Misty Mountains. Okay, that’s not true at all, but your writer buddy is definitely gonna’ love the Tolkien tribute.

For the gamer:

SNES Ring - $16

SNES Ring – $16

Oh My Geekness! How rad is this ring? OMG deals primarily in nerdtastic jewelry and cuff links. Each item is totally customizable, so you can even order their favorite game for extra bonus points.

For the crazy cat lady:

Cat Ears Ring - $15.06

Cat Ears Ring – $15.06

We all know a future cat lady in the making. Now, thanks to OST Accessories, that abundance of cat hair won’t be the only kitty-themed token they take out of the house.

11 Clever Last-Minute Costumes

So, Halloween is just days away, and you’re totally unprepared. No costume? No problem!  You don’t need a lot of time (or money) to pull together a creative get-up, thanks to the Internet. Whether you’re going solo, as a couple or with a group, I’ve got you covered. Here are 11 clever DIY costumes you can put together in less than 24 hours. So sit back, let loose a sigh of relief and get inspired.

1. Medusa

Medusa

Just raid your little brother’s closet for a few toy snakes and wear your bed sheets like a toga. Bam! Costume complete.

2. Carl from Up!

Up!

Proof that a few balloons and a trip to the thrift store can work wonders.

3. DumbleDora the Explorer

DumbleDora

Punny and confusing! All you need are some bright accessories and a noteworthy beard.

4. The Hanging Chad

Hanging Chad

You’re basically guaranteed to be the only hanging chad at the party.

5. Fifty Shades of Gray

Fifty Shades of Gray

Clever, cultural and creative. What more could you ask for?

—————- Couples Costumes —————

6. Google Maps

Google Maps

For maximum impact, be sure to play “God Blessed the Broken Road.”

7. Gotye

Gotye

This one’s all about the bodysuit, folks. Seriously. Your birthday suit is not a costume.

8. Mr. and Mrs. Fox

The Foxes

If you’re too cheap (or short on time) to get stellar fox masks, just print off a coloring sheet online. They’ll get the gist.

————— Group Costumes —————

9. Tetris

Tetris

No matter how many friends you have, there’s always room for one more.

10. Mario Kart

Mario Kart

Can you ever go wrong with Nintendo? No. No you cannot.

11. French Kiss

French Kiss

C’mon. It’s brilliant, and there’s nothing more to say.

Even if you didn’t find a costume, I hope you’re feeling inspired. Just in case you’re wondering, I did not include my own costume on the list (though it was cheap and a DIY) as I’m keeping the element of surprise on my side. If you have any ideas to add, feel to share them below. Otherwise, happy hunting! I’m sure you’ll find that perfect costume in no time.

DIY Summer Headwrap

Summer is in the air, and headwraps are all the rage this season. Just ask Urban Outfitters.

headwrap jerseylayered woodblockprint kerchief headwrap

But why pay $16 plus shipping and handling when you can make your own in less than an hour for $3? Just follow the simple steps below, and you’ll be on your way to hipster heaven in no time!

– – –

Supplies:

1/4 yard of printed jersey knit/poleyester blend fabric

1/4 yard of solid jersey knit/poleyester blend fabric

Needle and thread/sewing machine

Scissors

Sewing pins

– – –

1.  Cut out four 5″x26″ strips of fabric, two of each print. If you want a thin headwrap, use 3″x26″ strips instead.

Step 1

2. Round off the edges to reduce bulkiness on the back of the your neck.

3. Pin the wrong sides (non-print) of the coordinating fabric strips together and sew, leaving a small gap to flip the slip right-side out. If you’re feeling lazy, you can always use fabric glue instead, although it won’t be as durable.

Step 3

4. Once the strips are sewn together, wrap one strip of fabric around the middle of the other, folding it in half, to make an X shape.

Step 4

5. Sew each of the four ends together in the back, layering one on top of the other.

Viola! Congratulations on your new, ultra trendy headwrap.

Finished!

Now that wasn’t so hard, right? To simplify your next headwrap, check out these no-sew tips:

1. If you’re only using solid colors, you only need to cut out one strip of each color. This also means the only thing you’ll need to sew are the loose ends at the very end. If you can’t sew, you can simply tie the ends together, but use 30″ instead of 26″ to begin with.

2. If you’re using just one color, you can actually cut one giant strip, 5″x52″, and sew the ends to together to make a giant loop. Then, you simply wrap the loop around your forehead twice.

3. To score that $3 deal, keep an eye on the sales at Hancock Fabrics.

– – –

Feel free to share your tips and photos in the comments below, and make sure you follow my blog for more DIYs to come!

Make Your Own Disney Shoes

Around 6 months ago, on a Disney Pinterest binge, I spotted a pair of Little Mermaid shoes I simply had to have. The problem? The cheapest pair was $80. So, like any broke college kid with an inflated sense of craftiness, I decided to make my own and share the process with you.  If you’re not a Disney fan, no sweat. You could easily turn these into Star Wars, super hero, or Super Mario shoes (you can also do other unsuper things, as well.) Really, the options are limitless. There’s only 8 steps between you and a pair of whimsical kicks, so what are you waiting for?

Little Mermaid Shoes

Supplies:

  • White canvas shoes
  • Acrylic paints
  • Paintbrushes
  • Black Sharpie (optional colored)
  • Scotch Guard protective spray

1. Buy a pair of white canvas shoes. If you’re working on a budget, I suggest the $17.99  knock-off Vans from Payless. (click to view)

2. Browse coloring books or online pages for the design/character(s) you want. Once you have them, cut your designs out and make sure they fit on the shoe. Arrange them as you will paint them.

3. Using a wooden pencil trace the outline of your character onto the shoe. When you finish outlining, draw the inside lines, such as facial features and clothes. If you’re a truly unartistic person, you may want to phone a friend for this step.

4. Bust out the paints! You will want to use acrylic paints, which you can buy at Wal-Mart or Hobby Lobby. For small details like facial features, it’s easier to use colored Sharpies.

5. Let the shoes dry for at least 12 hours.

6. Go back with a black Sharpie or paint pen and outline all of your pencil lines to sharpen up the image.

7. If you want to do any extra paint effects, like shading, add these now after everything is outlined and dried.

8. Coat your shoes with Scotch Guard to protect them from dirt. Just like spray paint, stand about 10 feet away and spray your shoes thoroughly with two solid coats.

Voila! Congratulations, friend. You now have your very own pair of Disney shoes!

P.S. Have you followed my blog yet? Click “follow” on the sidebar to the left to get notifications on new posts!

WWMD: A Crafter’s Christmas

Sometimes the generous tidings of Christmas clash with the empty holes in your pocket, provoking an ugly “What now?”. Before “I’m sorry I couldn’t get you anything…” rears its dirty poor head, ask yourself one question: WWMD? That’s right, what would Martha do.

WWMD?

WWMD?

Because I idolize Martha Stewart the way young girls fawn over Hannah Montana, I decided to channel my inner Martha (who resides not so far from the surface) for a bit of holiday inspiration. Here’s a sneak peek at three of the gifts I’ve been working on for the past month.

If you’d like the pattern or recipe I used on any of the gifts below, simply click the picture.

Did someone say “lumberjack”?

Total Cost: $6

Total Cost: $6

I made this bearded hat for a dear hipster friend of mine because it’s a well-known fact that hipsters like beards. Also, Instagram wouldn’t let me save my own picture, so I had to use the pattern’s site picture. Sorry about the creepster in the velvet shirt. Anyways, it’s a perfect pattern for beginners and took only two hours to complete. The yarn was $3 for each color at Walmart, and despite urban myth about the crafting goods at Walmart, is actually quite soft and unitchy.

Yes, Mr. President, I will eat your face.

Total cost: $15

Total cost: $13

Made for a very special friend of mine with a fancy for all things colonial America, these cookies were generally inexpensive, though a bit time consuming, to make. I ordered the constitutional decal and cookie cutters from Ebay, but the rest is all Walmart. The trickiest part is the icing, as you want it to dry hard to avoid smearing on the other cookies. If you’re looking for a good icing recipe, just click the picture.

To infinity and beyond!

Total Cost: $4 or $8, depending on number of loops

Total Cost: $4 or $8

After a special request from my aunt, I began work on this most dapper scarf. It’s thick and dense to keep out the cold and is most relaxing to work on. The yarn is $4 per skein, so the overall cost just depends if you want one loop or two. Just knit this as you would any scarf, and when you feel it’s long enough, bind off and stitch the ends together with some leftover yarn.

Although these are not the only crafts I’ve been working on, they’re the only ones I can show at the time, being that their recipient has either already gotten them or knows what they’re getting. Perhaps after Christmas I can show you all the many  things I’ve been working on. Until then, remember: WWMD?